Changelog - Page 2

See the latest product updates for snappify.

🎛️ More Animation Configurations

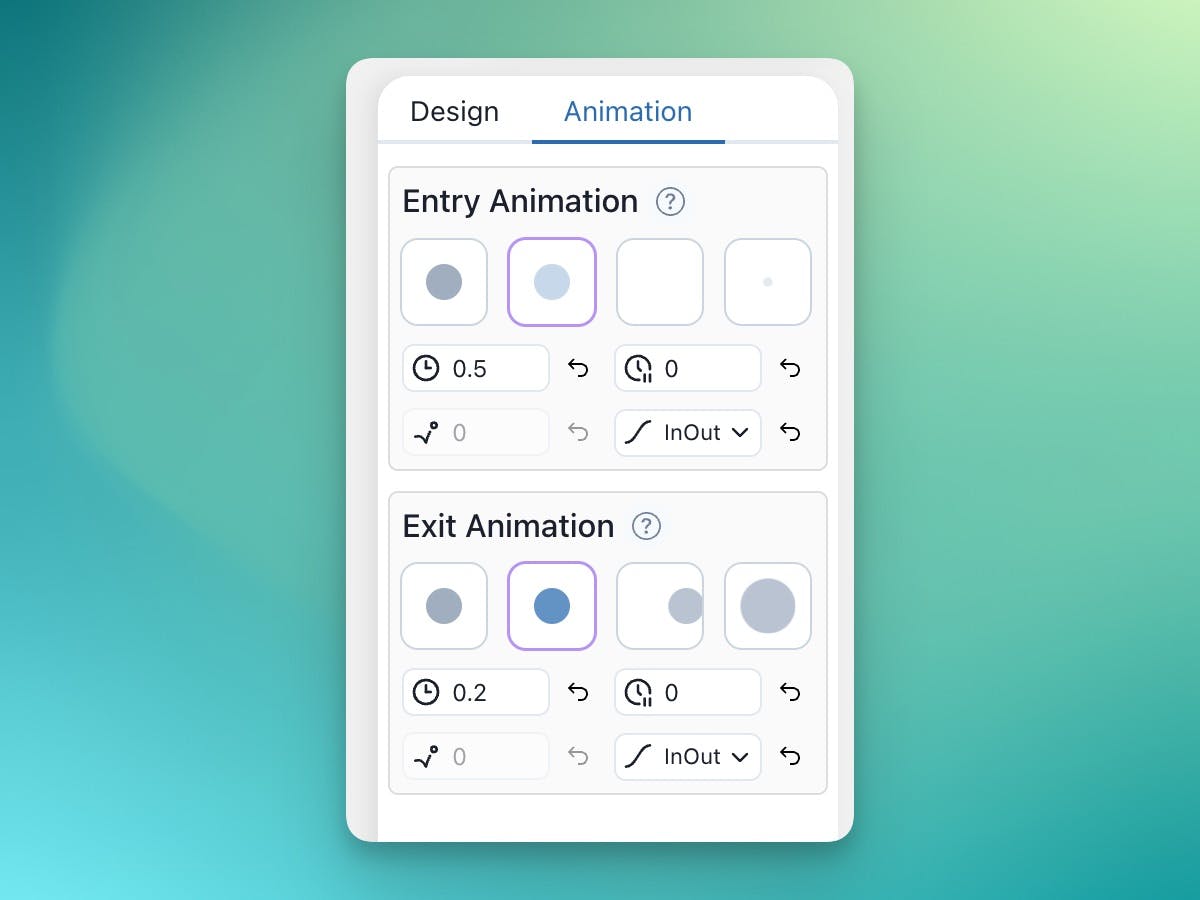
It's now possible to configure more aspects of animations in snappify Slides. We added the support for different entry and exit animations, but also let you configure the transition options for each animation.

You're now able to configure the following options:

  • Duration
  • Delay
  • Bounce Intensity
  • Easing
Screenshot of the new animation controls


Wanna stay up-to-date?

Sign up for our newsletter and we'll keep you updated with news about snappify


🔗 Richtext extensions

Exciting news! Our rich-text editor has just been upgraded to include support for links! 🎉

This enhancement is particularly useful when working on slides, as you now have the ability to add external links. Whether it's a link to a valuable resource, your website, or your social media profiles, you can effortlessly incorporate them into your content.

Furthermore, we've also introduced the ability to format text in italic and underline styles. These additional styling options offer even more flexibility to customize your text and make it stand out.

Richtext inline toolbar with italic, underline and link formatting options

📏 Guidelines while resizing

You'll now see Snapping Guidelines while resizing elements on the canvas. This helps you to align elements to each other. You can deactivate them by pressing while resizing.

We now also show a small Size indicator on the top left of the element.


📷 OpenGraph Images for your Snaps

When you share your snaps on Social Media or other platforms via its public URL, we show a preview image of your snap as the open graph image.

After initially publishing your snaps the OG image will first be generated. You can regenerate it manually at any given time. In the future we'd like to support uploading custom OG images as well.

Showcase of the OG Image setting in the embed modal.

💅 Copy and Paste element style

From now on you can copy and paste the style of a code-editor and rich-text element. This is especially useful if you want to quickly apply the same style across multiple elements.

Just open the context-menu with right-click on those elements and select "Copy Style" or "Paste Style".

A code-editor element with the context menu open

🎬 Video element

snappify has a new Video element which fits perfectly if you e.g. want to show the result or a product preview during a presentation! 🥳

In first place you can only paste a direct URL to the video from your cloud storage provider. In a later phase we will add the possibility to upload videos directly to snappify.

Promotion image showcasing the new video element

🌠 Background image

Until now it was only possible to specify either a solid or a gradient color for the background of your snap.

From now on it's also possible to specify an image 🥳

You can choose from a variety of background images we prepared for you in our library, or upload a custom image.

Before and after comparison of background configuration

📸 Background presets

We've introduced some Presets to easily change the size of your snap to the desired format of well-known social media platforms. We also added three presets for creating Slides in your presentation.

When you choose a preset, the background will enable to keep the aspect ratio, so you can resize it and still keep the desired format. You can toggle off the aspect ratio flag at any time.

Screenshot of the Background Preset popover

🌅 Background: Fixed / Auto Size

Additionally we refactored our previous "Spotlight element" logic to a simpler option called Background Auto Size.

Learn more about it in our Documentation.


💬 Inline toolbar & List-items

It's time for another update for our rich-text editor! 🥳

We've added a new inline toolbar that that appears when you’re editing text. It allows you to quickly format your text alignment, font size, font family, line height, letter spacing and text color.

New! You can now also add bullet and numbered list items. This is a must have for presentations- our brand new feature which is currently in Closed Beta

Promotion image showcasing the new toolbar with example text

✨ AI Explanations

It's now possible to create Code Explanations with our AI powered solution!

Just right-click on a selected code and let the AI generate an explanation for you. You can then edit the explanation to your liking.

👩‍💻👨‍💻 Teams plan

Now you can collaborate with your team members on a shared workspace. Each team member can create and edit snaps and folders.

The admin of the team can invite new members and manage them.

Currently our team plan includes up to 4 members. In the future, we will add the possibilities to add more members as the demand increases.

Promotion image showcasing the new Teams feature

🖼️ Code Editor Border

It's now possible to specify a border for code editor elements. This enables even more styles variations for your code snippets. 😄

You can find the setting in the right toolbar.

Showcase of the new Code Editor Borders

🤝 Position Constraint Scale

We've introduced a new Position Constraint called "Scale." When applied, this constraint allows elements to maintain their size relative to the background, which is particularly useful when placing background images and ensuring they cover the entire canvas.

Learn more about the different Position Constraints on our new docs page.

Video showcasing the Scale Position Constraint


💡 Explain code snippets

It's now even easier to create code explanations with snappify!

Just right click on the selected code in a code-editor element and click the "Explain" option. Checkout the docs for more informations.

Video showing the new code explanation feature


🏠 Sort Folders and Snaps

You're now able to sort Folders and Snaps on the Dashboard by their name, creation date or last modified date.

Screenshot of the Dashboard with the new sorting options

↦ Tab Size

The tab size (indentation) of the code editor can now be adjusted from 2 to up to 6 spaces.


👉 Arrow Improvements

You’re now able to attach arrows to elements! 🥳

That means you don’t have to reposition an arrow when you move around the element to which it is pointing at. It will automatically adjust its position.

Learn more about it in our new Arrow documentation.

Video showing the new arrow attachment feature

New way of drawing arrows and form elements

Additionally, we’ve refined the way of adding new arrows or form elements to your snap.

When clicking on the form element button on the top of the editor and choosing the desired element, you can now immediately start drawing on the canvas. This makes it easier to place the element right where you want it.

Video showing how to draw arrows and form elements


🎨 Color Picker Improvements

From now on, you will see all the colors you have used in the current snap at the top of each color picker. This gives you easy access to all relevant colors.

In addition, we have separated the recently used colors from the preset color palette to make both easier accessible. You can also pin the recently used colors to create your own preferred color palette

Promotion Image showing the color picker improvements

🎛 New Advanced Style Properties

We’ve introduced some new advanced style properties! 🥳 You’re now able to specify Blur, Grayscale, Sepia and Hue Rotation on every element!

Hint: this is also able on Group elements, so it’s easy to apply those effects on multiple elements at once.

Showcase of the new advanced style properties

🖼️ Static Images

We've improved our image component! Now, you can easily add handpicked dev-icons, emojis, and other icons. Plus, you can easily replace an image while keeping the configured settings on the right toolbar. In the element tree, you'll also see a small preview image for easier orientation.

For more information visit the docs.

Promotion Image showcasing the new static images

Create your next presentation

snappify will help you to create
stunning presentations and videos.

Get started-It's free